Looking for a guide on clip path background image removal? Start by using a clipping path to isolate and delete image backgrounds.
This technique is crucial for creating clean, professional images for various purposes, such as e-commerce product photos, graphic design projects, and more. By mastering the art of clip path background image removal, you can enhance the visual appeal of your images and make them stand out.
Whether you are a beginner or an expert in graphic design, understanding how to effectively remove backgrounds using a clipping path will elevate the quality of your work. Let’s delve into the details of this essential technique and learn how to create stunning, polished images with ease and precision.
Looking to remove backgrounds from images using clip path? Discover essential tools and techniques for easy and effective background removal.
When it comes to clip path background image removal, having the right tools is essential for achieving the desired results. Here are some essential tools that can make the process a breeze.
The first and foremost tool you need for clip path background image removal is reliable editing software. There are various editing software available, but Adobe Photoshop is one of the most popular choices due to its comprehensive features and user-friendly interface. With Photoshop, you can easily create and edit clip paths to remove unwanted backgrounds from images.
In addition to Photoshop, other editing software like GIMP and Pixlr also offer clip path tools that allow you to remove backgrounds with precision and accuracy. These software options are great alternatives for those who are looking for free or budget-friendly options.
Once you have selected your editing software, it is crucial to familiarize yourself with the clip path tool. The clip path tool allows you to create a path around the object you want to keep in the image, effectively removing the background. This tool works by creating a vector-based mask that defines the visible area of an image, giving you full control over what stays and what goes.
| Benefits of Using Clip Path Tool |
| Accurate and precise background removal. Flexible and versatile editing capabilities ability to retain fine details and edgesNon-destructive editing process. |
By understanding how the clip path tool works and its benefits, you can effectively remove backgrounds from images and achieve professional-looking results.
Having the right tools is vital for successful clip path background image removal. By selecting the appropriate editing software and understanding the clip path tool, you can efficiently remove unwanted backgrounds from your images and take your design projects to the next level.
To remove the background from an image using svg clip path background image, follow the steps below:
Refining edges is a crucial step in achieving seamless background removal. Use advanced tools like the pen tool in Photoshop to precisely outline the subject.
Shadows add a realistic touch to your edited image. Create subtle gradients and shadows to blend the subject seamlessly into the new background.
Once you have successfully removed the background using clip path, the next step is to optimize and export the edited image. It is important to ensure that the edited image is optimized for web usage, as this can greatly impact the loading speed of your website. Additionally, using the right file format and compression techniques can help retain image quality while keeping the file size small.
Choosing the right file format is crucial for optimizing and exporting the edited image. Two commonly used file formats for web images are JPEG and PNG.
JPEG is a lossy compression format that is ideal for photographs and images with a wide range of colors. It supports high levels of compression, resulting in smaller file sizes. However, keep in mind that the more you compress a JPEG image, the more quality loss it will experience. So, it’s important to find the right balance between compression and image quality.
PNG, on the other hand, is a lossless compression format that is ideal for images with fewer colors and areas of transparency. It preserves image quality but tends to result in larger file sizes compared to JPEG. If you need to retain transparency in your edited image, PNG format is the way to go. Otherwise, if transparency is not required, consider using JPEG to keep the file size smaller.
While optimizing your edited image, it’s essential to retain image quality as much as possible. Here are a few tips to help you achieve this:
In the process of removing background images with a clip path, it’s crucial to be aware of some practical tips and common mistakes to avoid. By being mindful of these considerations, you can streamline the removal process and achieve high-quality results. Let’s delve into these essential insights to enhance your skills in clip-path background image removal.
When engaging in clip path background image removal, utilizing keyboard shortcuts can significantly improve your efficiency. By learning and implementing key combinations, you can swiftly navigate through your editing software and execute essential commands. For instance, using shortcuts for selection, zooming, and tool selection can save valuable time and enhance your productivity.
One common mistake to steer clear of is over-editing. While it’s natural to refine the image to perfection, excessive manipulation can compromise the overall quality and realism. By exercising restraint and moderation in editing, you can maintain the integrity of the image and avoid unintended distortions. Remember, subtlety often yields the most polished results in clip path background image removal.
To remove the background from a clipping path in Photoshop, open your image in Adobe Photoshop. Use the Magic Eraser Tool to select and delete the background. Save the edited image after removing the background.
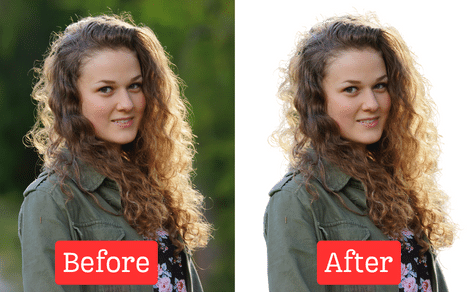
Clipping path service for background removal involves hand-drawn paths and photo masking to make backgrounds white or transparent, add shadows, crop, and resize images.
To remove the background from clip art in Photoshop, follow these steps:
1. Open the image in Adobe Photoshop.
2. Draw a clipping path around the object using the Pen tool.
3. Access the layer window and select the Magic Eraser tool.
4. Adjust the tool settings as needed.
5. Use the Magic Eraser tool to select and remove the background.
6. Save the image without the background.
To remove the background from an image, use editing tools like Fotor, Picsart, or Photoshop’s Clipping Path. Select the picture, use the background remover tool, and save the edited image. Professional services like Clipping Path Center also offer manual background removal and other image enhancements.
Clip path background image removal is an essential technique for creating visually appealing designs. By using manual and hand-drawn clipping paths, you can easily remove the background from an image, making it versatile and suitable for various purposes. Whether you need a white or transparent background, the clipping path service providers can help you achieve the desired results.
With the right tools, such as Adobe Photoshop, you can easily remove the background and save the edited image. Mastering the art of clip path background image removal can greatly enhance your design skills and elevate the overall quality of your work.


