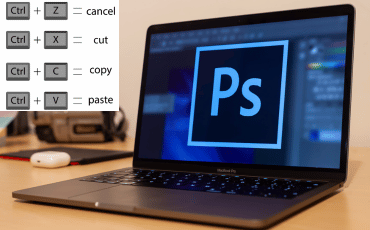
Easily create a clipping mask by pressing Option + click or Command + Option + G in Photoshop. These keyboard shortcuts streamline the editing process for e-commerce photos, ensuring efficient and precise results.
When it comes to enhancing product images for online stores, utilizing clipping masks with these shortcuts can significantly improve the overall quality and presentation. By harnessing the power of Photoshop shortcuts, e-commerce businesses can effectively showcase their products and attract more customers.
Let’s delve into the world of clipping path Photoshop shortcuts and discover how they can elevate your e-commerce photo editing game.

Credit: www.adeptclippingpath.com
In the world of e-commerce, where visual appeal plays a crucial role, clipping path in Photoshop shortcuts editing is a game-changer. By allowing precise manipulation of images, the clipping path empowers e-commerce businesses to showcase products in the best light.
| Keyboard Shortcut | Description |
|---|---|
| P | Select Pen tool |
| A | Select Direct Selection tool |
| H | Select Hand tool |
| ALT + Click | Create a corner at the point as you draw with the Pen tool |
| CTRL + = | Zoom in |
| CTRL + – | Zoom out |
How to create a clipping path in Photoshop: Launch Photoshop, select the Pen tool, draw around the object, and fully close the path to isolate the subject with precision.
Mastering clipping path shortcuts can immensely streamline the editing process and elevate the visual appeal of e-commerce product images.
Enhance your e-commerce photo editing skills with masterful Photoshop shortcuts for clipping paths. Streamline your process and create professional-looking product images effortlessly. Save time and effort with simple keyboard commands for precise and efficient photo editing.
Quickly enhance your e-commerce product images with efficient Clipping Path techniques using Photoshop shortcuts. Boost your productivity and streamline your editing process with these essential shortcuts.
Effortlessly create clipping masks using these handy keyboard shortcuts:
| Windows | Mac |
|---|---|
| Control + Alt + G | Command + Option + G |
Make your clipping path editing more precise and time-efficient by mastering these Photoshop shortcuts!
Enhance your e-commerce photos with Clipping Path Photoshop shortcuts for seamless editing. Easily isolate and refine product images using Pen tool precision for professional results. Master shortcuts like Command + Option + G to create precise clipping masks effortlessly.
In Photoshop, the Pen tool is an essential resource for creating precise clipping paths. With its ability to create anchor points and draw smooth, curved lines, the Pen tool allows for detailed and accurate selections. By mastering the Pen tool, you can efficiently trace around objects, creating high-quality clipping paths for your e-commerce product photos.
After creating a clipping path using the Pen tool, it’s crucial to ensure that the path accurately encompasses the desired object. By selecting the path and making necessary adjustments, such as refining edges or adding or removing anchor points, you can perfect your clipping path. This meticulous editing process is vital in achieving professional and polished e-commerce product images.

Credit: clippingpathmania.com
Enhance your e-commerce images effortlessly with clipping path techniques in Photoshop. Create precise selections and isolate objects for clean and professional product photos. Streamline your editing process with keyboard shortcuts for seamless image enhancements.
When it comes to enhancing e-commerce images, there is one powerful technique that can make a significant difference – clipping path. With a clipping path, you can easily remove unwanted elements from photos, such as blemishes, stray hairs, or distracting backgrounds. This technique involves creating a path around the object that needs to be isolated, allowing you to separate it from the rest of the image. By removing these unwanted elements, you can ensure that your e-commerce photos look clean, professional, and visually appealing.
Not only can you remove unwanted elements with a clipping path, but you can also make selective adjustments to specific areas of your e-commerce photos. By using the pen tool in Photoshop to create a clipping path around the desired area, you can apply various adjustments, such as color correction, brightness, contrast, and saturation, to that specific region only. This allows you to enhance the overall look and feel of your products, making them more attractive to potential customers.
Furthermore, with the ability to make selective adjustments using Photoshop clipping path, you can easily highlight important details in your e-commerce photos. Whether it’s showcasing intricate textures, emphasizing product features, or enhancing the overall product presentation, this technique gives you full control over the visual aspects of your images.
When it comes to editing e-commerce photos, efficiency is key. The time spent on editing each product image can add up, affecting productivity and the overall workflow. That’s where clipping path shortcuts in Photoshop come in. By using keyboard shortcuts, you can streamline your image editing process and maximize your productivity. In this article, we will explore efficient editing methods with keyboard shortcuts and how they can optimize your workflow in eCommerce image editing.
Editing e-commerce photos can be a time-consuming task, especially when done manually. However, with the help of clipping path shortcuts in Photoshop, you can significantly speed up your editing process. These keyboard shortcuts allow you to perform various actions with just a few keystrokes, eliminating the need for repetitive tasks and minimizing the time spent on each image.
Here are some essential clipping path shortcuts to enhance your editing efficiency:
| Shortcut | Action |
|---|---|
| P | Select Pen tool |
| A | Select Direct Selection tool (to adjust points created with the Pen tool) |
| H | Select Hand tool |
| ALT + click (OPTION + click on Mac) | Create a corner at the point as you draw with the Pen tool |
| CTRL + = (COMMAND + =) | Zoom in |
| CTRL + – (COMMAND + -) | Zoom out |
In the highly competitive world of e-commerce, the ability to edit product images quickly and efficiently is crucial. Using clipping path shortcuts can help you maximize your productivity in eCommerce image editing. By reducing the time spent on each image, you can process more photos in less time, ensuring a smooth workflow and meeting tight deadlines.
Here are some tips to help you maximize your productivity:
By implementing these strategies and incorporating clipping path shortcuts into your image editing process, you can optimize your workflow, save time, and achieve better results in e-commerce image editing.
In Photoshop, the clipping shortcut keys are Option + click or Command + Option + G to create a clipping mask between layers. For selecting a created clipping path, use the shortcut ‘Ctrl + Enter’.
To select the clipping path you created in Photoshop, use the shortcut ‘Ctrl + Enter’.
To create a clipping path in Photoshop, follow these steps: 1. Open Photoshop and load the image you want to edit. 2. Select the Pen tool from the toolbar. 3. Use the Pen tool to draw a path around the object you want to isolate.
4. Make sure the path is closed. 5. Right-click on the path and choose “Make Selection” from the drop-down menu. 6. Click “OK” to create the clipping path. That’s it! Your clipping path is now ready to be used for selective adjustments.
In Photoshop, Ctrl Shift E is a shortcut to merge all visible layers into a new layer.
To sum up, mastering Photoshop shortcuts for clipping paths is a game-changer for e-commerce photo editing. This efficient technique not only saves time but also ensures precision. By utilizing keyboard shortcuts, you can streamline the process and elevate the quality of your product images, ultimately enhancing your e-commerce business.


