September 24, 2026
High-quality product images are essential for running a successful Shopify store. Customers cannot physically touch or examine products online, so images often become one of the most important factors in their purchasing decisions. However, simply uploading attractive photos is not enough. Large, poorly formatted, or unoptimized images can slow down your Shopify store, reduce the user experience, and potentially hurt conversions.
Learning how to optimize images for Shopify stores can help you create faster pages, improve visual quality, support SEO, and provide customers with a smoother shopping experience. Whether you are a small e-commerce seller, professional photographer, or digital agency managing multiple Shopify stores, image optimization should be part of your regular workflow.
This guide explains practical ways to optimize Shopify product images without sacrificing quality.
Images are often some of the largest files loaded when someone visits an e-commerce website. Product galleries, banners, collection images, lifestyle photographs, and promotional graphics can quickly increase page size.
If these images are unnecessarily large, visitors may experience slower loading times, especially on mobile devices or slower internet connections.
Optimized images can help you:
For e-commerce businesses, these improvements matter because customers expect online stores to load quickly and display products clearly.
One of the simplest ways to optimize Shopify images is choosing an appropriate file format.
Common formats include JPEG, PNG, WebP, and newer formats such as AVIF.
JPEG is commonly used for product photography because it provides good image quality at relatively small file sizes.
It works particularly well for:
For photographic content, JPEG can often provide an excellent balance between quality and file size.
PNG supports transparency and can preserve sharp details. It is useful for certain graphics, logos, icons, and images that require transparent backgrounds.
However, PNG files can become significantly larger than JPEG files when used for ordinary photographs.
WebP is designed to provide efficient compression while maintaining good visual quality. It has become widely used across modern websites because it can reduce image file sizes compared with traditional formats.
For Shopify sellers, using efficient modern image formats can be an important part of an overall image optimization strategy.
AVIF can provide highly efficient compression and excellent quality. However, compatibility and workflow considerations should be evaluated before making it the standard format for every image.
The most important rule is simple: choose the format according to the type of image and the requirements of your store.
One of the most common image optimization mistakes is uploading photographs that are much larger than necessary.
For example, a product photographer might capture a product photograph at 6000 × 4000 pixels. While that resolution may be useful for editing and archival purposes, the Shopify product page may not need the original camera file.
Instead of uploading unnecessarily huge files, resize images according to their intended use.
Before resizing, consider:
The goal is not to make every image as small as possible. The goal is to provide enough resolution for customers to see important product details without delivering unnecessarily large files.
Image compression reduces file size while attempting to preserve visual quality.
There are two common approaches: lossless and lossy compression.
Lossless compression reduces file size without removing image information.
Lossy compression removes some information to achieve a substantially smaller file size.
For most e-commerce product photography, carefully controlled lossy compression can provide an excellent balance between image quality and performance.
However, aggressive compression can create visible artifacts, blurry edges, banding, or unnatural textures.
Always inspect compressed images before publishing them. A small file is not useful if customers cannot clearly see the product.
Consistency is especially important for Shopify stores with many products.
Imagine browsing a collection page where one product image is square, another is extremely tall, and another is wide. The inconsistent layout can make the store look less professional.
Using consistent image dimensions and aspect ratios can create a cleaner product grid.
For example, a store may use a consistent square format for product images. Another brand might use a specific landscape or portrait ratio based on its theme and product category.
The important thing is to establish a standard and apply it consistently.
Background removal is another important part of e-commerce image optimization.
A clean white or neutral background can make products easier to see and create consistency across a catalog.
Professional background removal is particularly useful for:
Removing distracting backgrounds can help customers focus on the product itself.
For complex products, manual clipping path or professional image masking may produce better results than basic automatic background removal.
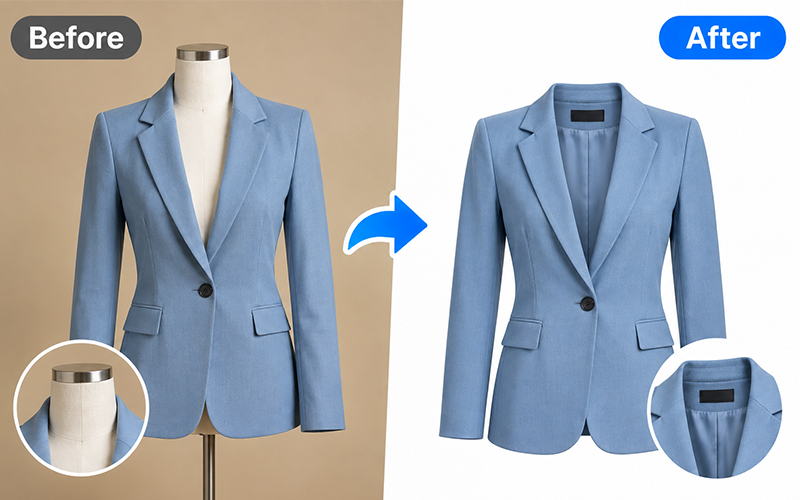
Image file names can also contribute to better image organization and SEO.
Instead of uploading a file named:
IMG_4587.jpg
use a descriptive name such as:
black-leather-handbag.jpg
A useful file name should describe the product naturally.
Avoid stuffing keywords into filenames. Keep them short, descriptive, and relevant.
For example:
Good:
women-black-leather-handbag.jpg
Less useful:
best-cheap-black-handbag-women-fashion-online-shop.jpg
The first option is clearer for both humans and search engines.
Alt text is another important part of Shopify image optimization.
Alt text describes an image for users who cannot see it and can also provide search engines with additional context about the image.
For example:
Blue cotton men’s casual shirt
is more useful than:
product image
Good alt text should be:
Avoid keyword stuffing. If an image shows a red leather handbag, describe what is actually shown rather than repeatedly adding unrelated keywords.
Mobile optimization is particularly important for e-commerce websites.
A significant portion of online shopping activity happens on smartphones. Customers may browse Shopify stores using mobile data connections, older devices, or slower networks.
Large image files can therefore create a poor experience.
When optimizing product images, test how they appear on:
Pay attention to image loading, cropping, readability, and product detail.
An image that looks excellent on a large desktop monitor should still provide a useful experience on a smaller smartphone screen.
Product images are important, but more images are not always better.
A product page should provide enough photographs to answer customers’ questions without overwhelming them.
Depending on the product, useful images might include:
Choose images that add useful information rather than uploading multiple photographs that communicate essentially the same thing.
Customers often want to inspect a product from different angles before purchasing.
For example, a clothing store could show the front, back, side, and close-up details of a garment.
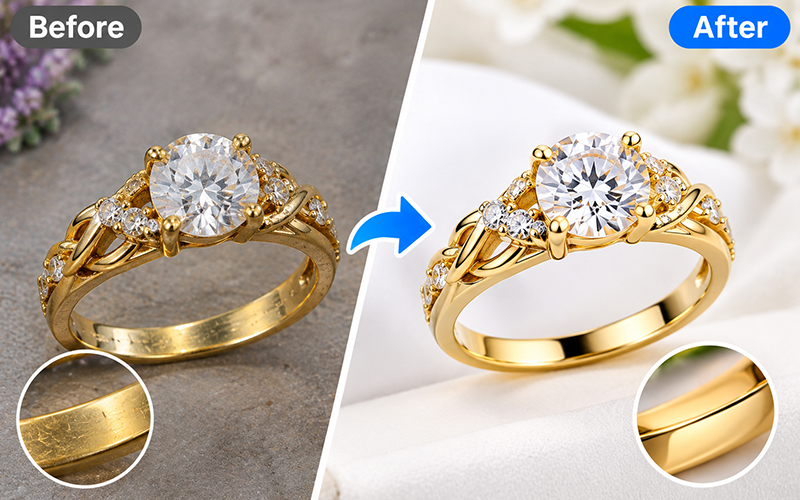
A jewelry store might show:
These additional views can help customers understand what they are buying and reduce uncertainty.
Professional photographers and image editing agencies can help create a consistent visual style across these product views.
Not every Shopify image needs to be a traditional product photograph.
Lifestyle images can show products in realistic environments and help customers understand how they might use them.
For example:
A furniture brand can show a sofa inside a living room.
A fashion brand can show clothing being worn by a model.
A kitchen brand can show cookware being used during meal preparation.
Lifestyle photography can complement standard product images and create a stronger visual identity for a Shopify brand.
However, lifestyle images should also be optimized for file size and page performance.
Professional image editing can improve product presentation before images reach your Shopify store.
Common e-commerce editing services include:
For large product catalogs, outsourcing these tasks to a professional image editing agency can help maintain consistency while saving internal production time.
Product pages are not the only places where image optimization matters.
Collection pages also contain multiple images and can become image-heavy.
When optimizing collection images:
A consistent collection grid can make your Shopify store look more organized and professional.
Image optimization does not mean making every image extremely small.
If compression is too aggressive, product photographs may become blurry or show visible artifacts. This is especially problematic for products where texture and fine details influence purchasing decisions.
For example, customers shopping for jewelry may need to see:
Similarly, clothing customers may need to see fabric texture and stitching.
The right approach is to find the best balance between image quality and file size.
After optimizing images, test your Shopify store rather than assuming everything is working correctly.
Check important pages such as:
Look for slow-loading images, layout problems, poor cropping, or images that appear blurry.
Website performance tools can also help identify large resources and other performance issues.
Remember that image optimization is only one part of overall Shopify performance. JavaScript, apps, theme code, fonts, third-party services, and other resources can also affect page speed.
If you regularly upload products, creating a repeatable workflow can save time.
A simple workflow might look like this:
Step 1: Capture high-quality product photographs.
Step 2: Edit exposure, color, and composition.
Step 3: Remove or replace distracting backgrounds when necessary.
Step 4: Resize images according to your Shopify requirements.
Step 5: Compress images while maintaining acceptable quality.
Step 6: Choose an appropriate image format.
Step 7: Rename files descriptively.
Step 8: Add relevant alt text.
Step 9: Upload images to Shopify.
Step 10: Check the final product page on desktop and mobile.
Following the same process for every product can improve catalog consistency and reduce mistakes.
Several mistakes can negatively affect image performance and presentation.
Camera photographs can be extremely large. Uploading them without resizing or compression may create unnecessary file weight.
Optimization cannot fix an image that was poorly photographed. Start with a clear, well-lit product photograph.
Extreme compression can make products appear blurry or pixelated.
Always inspect how product images appear on smartphones.
Descriptive filenames make image libraries easier to manage and provide useful contextual information.
Alt text should describe the image naturally rather than being written solely for search engines.
For growing e-commerce businesses, image editing can become a major part of the product publishing process.
Professional image editing services can help Shopify sellers maintain consistent backgrounds, colors, dimensions, shadows, and product presentation across large catalogs.
This is especially valuable for businesses working with hundreds or thousands of products.
An experienced image editing team can process different types of product photography while following brand-specific guidelines.
For example, a Shopify fashion store may require consistent ghost mannequin images, while a jewelry business may need detailed masking and retouching.
Professional editing can therefore complement technical image optimization by improving the actual visual quality of the product catalog.
Knowing how to optimize images for Shopify stores is essential for creating a fast, professional, and user-friendly e-commerce website.
Start with high-quality photography, choose appropriate image formats, resize oversized files, compress images carefully, maintain consistent dimensions, and create descriptive filenames and alt text. Most importantly, always balance performance with visual quality.
For Shopify sellers, photographers, and agencies managing large product catalogs, professional image editing can make this process easier. Services such as background removal, clipping path, retouching, resizing, color correction, and shadow creation can help create consistent product images ready for online stores.
A strong image optimization workflow does more than reduce file size. It helps your products look professional, improves the shopping experience, and gives customers clearer visual information when deciding whether to buy.
When every product image is carefully prepared, your Shopify store can deliver a more polished experience from the first product view to checkout.