November 10, 2026
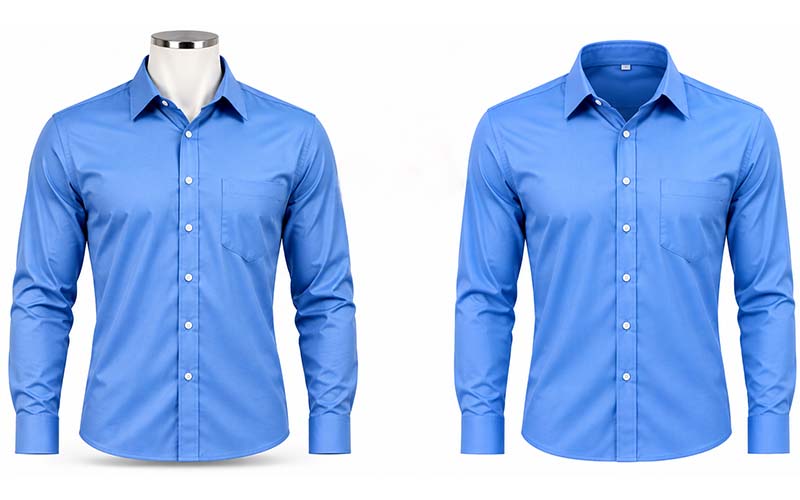
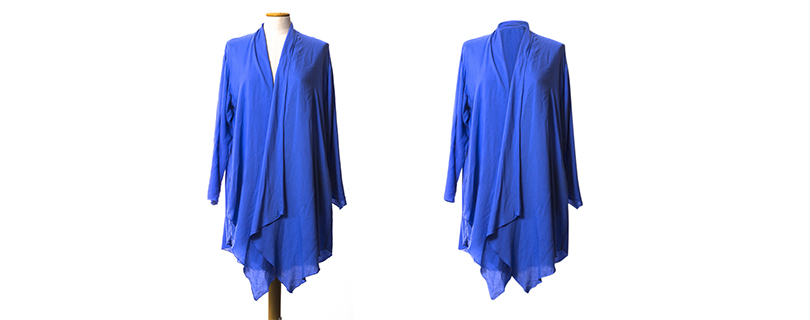
Ghost mannequin photography helps clothing brands show the shape and fit of a garment without leaving a visible mannequin in the final image. The technique is common for shirts, jackets, dresses, and other apparel because it keeps attention on the clothing while suggesting how the item is structured. Creating a convincing result requires more than removing the mannequin. The garment must look three-dimensional, seams should align naturally, and necklines or inner labels may need to be combined from additional photographs. Careful capture and editing work together to create a clean, realistic presentation.
The process usually involves photographing a garment on a mannequin, then editing the image to remove the mannequin and reveal selected inner areas. For some garments, an additional photograph of the inside collar, neckline, or back opening is needed. The editor combines the relevant parts so the clothing appears to hold its shape on an invisible form.
This is different from simply cutting out a garment against a plain background. A convincing ghost mannequin result preserves the garment’s structure and creates a natural hollow area where appropriate. The exact workflow depends on the clothing design, camera angle, and the images available.
Good editing starts with good photography. Steam or prepare the garment as appropriate, arrange sleeves and hems, and check that the item is centered. Use consistent lighting and camera position across the product range. Avoid hiding important seams, logos, buttons, or design details behind folds or mannequin parts.
Capture additional views when the neckline, inner lining, or back construction will need to be shown. Keep the camera angle and lighting as consistent as possible between the main photograph and detail shots. If source images do not align, the editor may have to compensate for perspective or lighting differences, which can make the final composite less convincing.
Mannequin removal requires precise selections around the clothing edges. The editor must preserve narrow straps, sleeve openings, curved collars, and small spaces between fabric sections. Rough edges, leftover mannequin color, and missing garment material can make the image look artificial.
Careful masking or clipping paths can separate the garment from the background, while additional retouching can clean distracting marks. However, editors should not reshape the garment in a way that misrepresents its actual fit. The goal is a clear presentation of the product, not a digitally redesigned version of it.
The inner neckline is often the most recognizable part of a ghost mannequin image. If an inside-collar photograph is available, the editor can combine it with the main image to create a believable hollow effect. Alignment, shadows, and edge transitions need attention so the inserted section looks like part of the same garment.
Depth is important, but excessive shadow can make the opening look dirty or unnaturally deep. The result should match the fabric and lighting. Review the neckline, shoulders, sleeves, and side seams together; a realistic collar cannot compensate for distorted garment proportions elsewhere.
Online shoppers often compare sizes, colors, and styles across a clothing collection. Use consistent image dimensions, crop, background, garment scale, and viewing angle wherever practical. Consistency helps customers compare products and gives the store a more organized appearance.
Create separate guidelines for different garment types if needed. A structured jacket and a soft T-shirt may require different arrangements, but they can still follow common rules for margins, background, and overall image scale. Review color variants together to ensure that editing has not introduced inconsistent tones.
Check the finished image at normal viewing size and close zoom. Look for visible mannequin remnants, unnatural openings, broken seams, uneven edges, inconsistent shadows, or missing details. Compare the image with the physical garment or the original photographs to make sure the edit has not changed important product features.
Also confirm the final crop, dimensions, file format, and filename. For large catalogs, use a written checklist and inspect a representative set from each batch. Clear feedback early in the process helps maintain a reliable style across future product launches.
Before the work begins, translate your expectations into instructions that can be followed consistently. State the objective, required output, technical specifications, and any details that must remain unchanged. Include representative examples and identify unusual images that may need special handling. A concise brief is more useful than a long request that leaves important decisions open to interpretation.
Ask the person completing the work to raise questions before processing a full batch. Confirm assumptions about edge treatment, color, crop, naming, file format, and revision rules. This small alignment step can prevent large amounts of rework and creates a reference that can be reused for future projects.
A frequent mistake is to focus on the finished image while overlooking the process that produces it. Unclear filenames, inconsistent source files, missing references, and late changes to the brief can cause errors even when the editing itself is strong. Establish a predictable way to submit files, communicate changes, approve samples, and receive final outputs.
Another mistake is to judge a provider or method using only one easy image. Include representative examples and assess the output as a group. Check both visual quality and delivery accuracy, and record issues in a way that makes them easy to correct. A consistent workflow makes problems easier to identify before they spread across an entire project.
Before approving delivery, check the image against the original brief. Confirm that the subject is intact, important details remain visible, the color and crop are appropriate, and there are no distracting edges or artifacts. Verify file dimensions, formats, naming, and the number of files received. A visual review and a technical file check catch different types of errors, so both should be part of the process.
Use the checklist proportionately. High-value, complex, or campaign-critical images may need a full review, while routine items can be reviewed through a consistent sampling process once the workflow is proven. If an error appears repeatedly, increase inspection and update the instructions until the issue is resolved.
Do not treat the first delivery as the only measure of success. Over several projects, track recurring corrections, turnaround reliability, communication quality, and the amount of internal time required to prepare or fix files. These observations provide a more realistic view of the process than a single successful example.
Use the results to make targeted improvements. If errors cluster around one image type, provide better reference material or adjust the technique. If files are frequently misplaced, revise the naming process. Regular, practical reviews help keep the workflow aligned with changing products, catalog size, and business priorities.
It is an apparel product image edited to remove the visible mannequin while preserving the garment’s shape and selected inner details.
Often, yes. An additional inner-neck or back-opening image may be needed, depending on the garment design.
Shirts, jackets, dresses, trousers, and many other structured or semi-structured garments can be suitable.
Editing can correct some distractions, but careful garment preparation and consistent photography produce better results.
Choosing the right approach to ghost mannequin images starts with a clear understanding of your images, quality expectations, deadlines, and workflow. Define the result you need, use representative examples, and review the output against consistent standards. A practical process helps your team avoid preventable revisions and make better decisions as image volume grows. Revisit your workflow periodically so it continues to fit your products, customers, and business goals.